Sunday, 29 June 2014

dcm4che-tool-dcmvalidate

usage: dcmvalidate --iod <iod-file> [<dicom-file>..][<directory>..]

Utility to validate DICOM objects according a specified Information Object
Definition.
-
Options:
 -h,--help             display this help and exit
    --iod <iod-file>   path to xml file with Information Object Definition
 -V,--version          output version information and exit
Example:
$ dcmvalidate --iod etc/dcmvalidate/dicomdir-iod.xml DICOMDIR
 Validate DICOMDIR against IOD specified in etc/dcmvalidate/dicomdir.xml
 
Download Code : dcm4che-tool-dcmvalidate 
For Your reference : dicomdir-iod.xml
Saturday, 28 June 2014

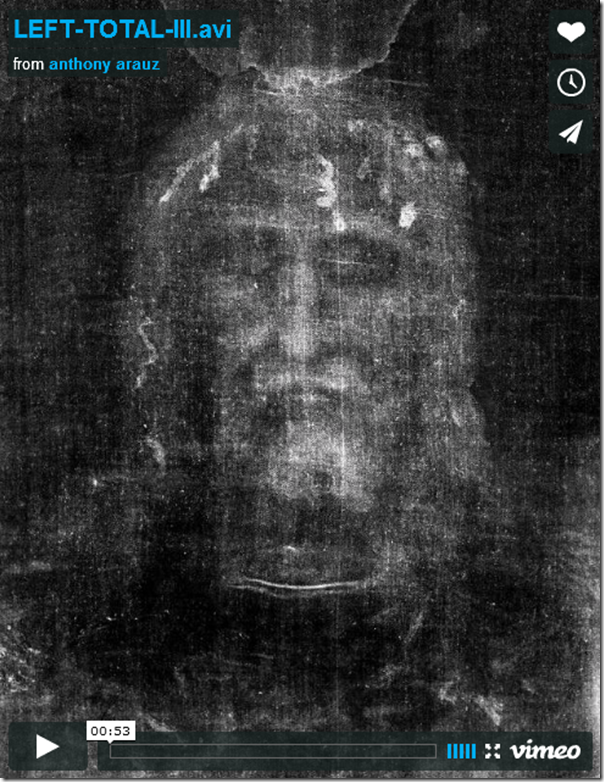
Speaking of 3D

This is a 3D enhanced moving image and not, it seems, a true 3D plot. How did Petrus Soons and his team do this? Notice that the background behind the head is treated differently than the head. Is there anything else peculiar about this? I call your attention to a previous posting, I certainly have real reservations about Petrus Soons’ 3D work. Any comments now?, Do read the many thoughtful comments that resulted. Click here or on the image, below. 


Monday, 16 June 2014

OTech: How Dirty Is Your DICOM Data?


This looks like a nice image, but the
 metadata could be totally incorrect or corrupted
  • If you would take a snapshot of any DICOM archive and check the image headers for correctness, I would argue that there are quite a few hidden problems that you might not know about.

  • Errors in a DICOM header can cause images to be incorrectly displayed, incorrectly added to the database, or being flatly rejected by the PACS. By DICOM errors, I don’t mean an incorrect Accession Number of patient name, or duplicate ID, but rather a violation of the rules defined in the DICOM standard for a particular field entry.
  • For more details : OTech: How Dirty Is Your DICOM Data?:
  • Following is video for showing how to do..

Sunday, 15 June 2014

Writing ImageJ Plugins

These instructions for getting started writing plugins for ImageJ2 were developed at the Fiji / ImageJ2 Hackathon in Dresden, Germany, December 2011, using the Eclipse IDE version 3.7 and Sun JDK 1.6 on Ubuntu 11.04. It assumes that you have a working installation of ImageJ2, from http://developer.imagej.net/downloads.

Configure your environment

  1. Install JDK 6, needed for the javac compiler, using your system install mechanism or by downloading from http://www.oracle.com/technetwork/java/javase/downloads/index.html
  2. Install Eclipse IDE version 3.7 for Java developers from http://eclipse.org/downloads/, using the appropriate download for your system.
  3. Download imagej-2.0.0-SNAPSHOT-all.jar from http://developer.imagej.net/downloads and save it somewhere handy; I have mine in a directory called JavaLibs.
  4. Run Eclipse and tell it to use JDK 6 as the default JRE for new projects (Window > Preferences > Installed JREs > Add... > Standard VM > Navigate to your JDK install directory
  5. Right click in the Package Explorer > New... > Java Project
  6. Give your project a name, e.g. IJ2-plugins, hit Next
  7. Under the Libraries tab Add External Jars... and navigate to the imagej-2.0.0-SNAPSHOT-all.jar you downloaded in step 3. This gives you access to the IJ2 application programming interface (API). At the time of writing, to get context Javadoc for ImgLib classes you also have to specify the URL of its Javadoc. Click on the triangle to the left of imagej-2.0.0-SNAPSHOT-all.jar, select "Javadoc location:", hit Edit, add the URL:
    http://jenkins.imagej.net/job/ImgLib-daily/javadoc/
    Hit Validate and if everything is OK, hit OK.
  8. Configure Ant to do your build using the javac compiler
    1. Copy this code and paste it into your project in a file called build.xml
      <project name="Plugins for ImageJ2" default="" basedir=".">
      <description>
      ImageJ2 build file
      </description>
      <property name="src" location="src" />
      <property name="build" location="javacbin" />
      <property name="imagej2Plugins" location="/home/mdoube/imagejdev/plugins/" />
      <property name="user.name" value="Michael Doube" />
      <path id="plugin-classpath">
      <fileset dir="/home/mdoube/JavaLibs/">
      <include name="imagej-2.0-SNAPSHOT-all.jar" />
      </fileset>
      <pathelement path="${build.dir}" />
      </path>
      <target name="init">
      <!-- Create the time stamp -->
      <tstamp />
      <!-- Create the build directory structure used by compile -->
      <mkdir dir="${build}" />
      </target>
      <target name="compile" depends="" description="compile the source ">
      <!-- Compile the java code from ${src} into ${build} -->
      <javac includeantruntime="false" srcdir="${src}" destdir="${build}">
      <classpath refid="plugin-classpath"/>
      </javac>
      <echo>
      Building the .jar file.
      </echo>
      </target>
      <target name="compress" depends="" description="generate the distribution">
      <jar jarfile="IJ2Plugins.jar">
      <fileset dir="${build}" includes="**/*.*" />
      <manifest>
      <attribute name="Built-By" value="${user.name}" />
      </manifest>
      </jar>
      <copy file="IJ2Plugins.jar" toDir="${imagej2Plugins}" />
      </target>
      <target name="clean" description="clean up">
      <!-- Delete the ${build} and ${dist} directory trees -->
      <delete dir="${build}" />
      </target>
      </project>
    2. double-click on build.xml and edit it so that the fileset dir="" field contains the ij-app jar and the ImageJ2Plugins location is set to your local ImageJ plugins directory
    3. you can also edit the name of the jar that's generated
    4. now right-click on your project in the Package Explorer > Properties > Builders > New > select Ant Builder > Enter a name for your builder
    5. Main tab, under Buildfile: hit Browse Workspace and locate the build.xml you just made, hit OK
    6. Targets tab, After a “Clean”: Set targets, check init, compile, compress, clean
    7. Targets tab, Auto Build: Set targets, check init, compile, compress, clean

Hello World

Writing your first plugin: HelloWorld

  1. Right-click on the src directory of your new project and New > Class
  2. Give your class a name; e.g., HelloWorld (the convention for classes is to be capitalised like that)
  3. Eclipse initialises a new file and puts a little code into it for you.
    1. Edit the first line so it reads: public class HelloWorld implements RunnablePlugin {
    2. Note the squiggly red line under RunnablePlugin indicating a compile error, move your cursor to it and hit Ctrl+1
    3. Eclipse gives you a bunch of autocorrect options, select the top one, Import 'RunnablePlugin' (imagej.ext.plugin) and hit Enter. Eclipse adds a line of code for you at the top of the file: import imagej.ext.plugin.RunnablePlugin;
    4. Now HelloWorld gets a squiggly line, so Ctrl+1 again and select Add Unimplemented Methods. Eclipse adds a bunch of code, which is the run() method needed because we are implementing the RunnablePlugin interface.
    5. We want HelloWorld to show up in the ImageJ menus, so add an annotation above the public class line: @Plugin(menuPath = "Plugins>Hello World")
    6. Ctrl+1 again on the @Plugin squiggly line to autocorrect the missing import.
    7. You can Ctrl+Space and Eclipse will suggest options for autocompletion.
  4. Let's check ImageJ and see if our plugin is available in the menus.
    1. Run ImageJ
    2. You should now see in ImageJ's Plugins menu an item called Hello World
    3. But it doesn't do anything yet because we haven't added any useful code
  5. Add code to your HelloWorld until it matches HelloWorld.java below, using Ctrl+1 and Ctrl+Space to investigate possibilities in the API
    1. Each time you update your code, Ant rebuilds your jar and copies it to your plugins directory
    2. At the moment, you have to restart ImageJ to test your changes

HelloWorld.java

import imagej.ext.plugin.Parameter;
import imagej.ext.plugin.Plugin;
import imagej.ext.plugin.RunnablePlugin;
import imagej.ui.UIService;

@Plugin(menuPath = "Plugins>Hello World")
public class HelloWorld implements RunnablePlugin {
@Parameter
private UIService uiService;

@Override
public void run() {
uiService.showDialog("Hello world.");
}
}

Monday, 9 June 2014

Interactive Stack Rotation

Here is a screencast how to use the Interactive Stack Rotation plugin:


For a quick overview of keyboard shortcuts, please press the F1 key to be shown this usage:

InteractiveStackRotation.jpg

What are you looking for?


ImageJ 1.x
The current, stable version is known simply as "ImageJ"—or sometimes "ImageJ1" or "IJ1" to differentiate it from ImageJ 2.x, which is still in beta.

Read more...

ImageJ 2.x
ImageJ2
ImageJ 2.0.0, referred to as "ImageJ2" or "IJ2" for short, is currently in development. It is a complete rewrite of ImageJ, but includes ImageJ1 with a compatibility layer, so that old-style plugins and macros can run the same as in IJ1.

Read more...
Fiji
Fiji
Fiji is a distribution of ImageJ (both ImageJ1 and ImageJ2!) for the life sciences. It provides a large number of additional plugins to facilitate analysis of life sciences images, particularly microscopy images.

Read more...
Or see the table of ImageJ flavors for a more complete rundown of various ImageJ-related software.