Thursday, 19 December 2013

How to convert int[] into List in Java?

public List<Integer> asList(final int[] is)
    {
            return new AbstractList<Integer>() {
                    public Integer get(int i) { return is[i]; }
                    public int size() { return is.length; }
            };
    }
The smallest piece of code would be
public List<Integer> myWork(int[] array) {
        return Arrays.asList(ArrayUtils.toObject(array));
}
where ArrayUtils comes from commons-lang :)

Tuesday, 17 December 2013

JavaFX 3D Hello World

To compile JavaFX with 3D features you have to get the early access version of the JDK8.


At the moment as far as I know there is only a windows support for the 3D features, but abuild for Mac and Linux will soon be released. (Luckily enough 3D support also works for a virtualized Windows running on Mac - this is how i got to the screeenshots.)

This blog entry is about a Scala version of the provided 3D examples

First, there is the class PhongMaterial, which defines some sort of "Phong shaded material". Basically you can create a material which can have a color or some texture. 

a red box and a blue sphere rendered with JavaFX

This is a screenshot of the same program, different colors, with a bumpmap applied:

example using a bump map
Here is the code:

How to change tabs' strings orientation?

Set following CSS for Tab pane in .CSS file

-fx-tab-min-width: 30px;
-fx-tab-max-width: 30px;
-fx-tab-min-height: 130px;
-fx-tab-max-height: 130px; 

After that set label in Tab graphics,
Set Min Width for label (Must require)

Monday, 16 December 2013

JavaFX 2 vs Java3D

Java3D

  • The Java 3D API is a high-level library for creating 3D-graphics including animation and transformation of 3D-objects.
  • The Java 3D API operates with objects that are placed in the scene graph that is the tree of 3D-objects and is intended to render.
  • Java3D application can run as a desktop application or as an applet or as a desktop application and an applet.
  • The Java 3D API is presented by the basic package javax.media.j3d and support packages com.sun.j3d.utils, java.awt, javax.vecmath.
  • In fact, the Java 3D API is a wrapper of the graphic systems OpenGL and DirectX.


Java3D installation

  • Download the distributive at http://www.oracle.com/technetwork/java/javase/tech/index-jsp-138252.html.
  • Run the installation program. The result will appear in the JDK directory as the folder Java3D.
  • The installed files on the Java3D folder work as the runtime over JDK for programs that use the Java 3D API.
  • To develop programs using the Java 3D API download the NetBeans plugin at http://plugins.netbeans.org/plugin/32144/java-3d and install it using the option Tools | Plugins | Downloaded | Add Plugins.
  • You can then include the import of the Java 3D API libraries in a Java application project.

Java3D programming model

  • To create a Java3D application first creates the VirtualUniverse object.
  • Each Java3D application has only one object VirtualUniverse, which represents a virtual space that is associated with a scene graph.
  • Further create the BranchGroup object that represents the root node of the branch of the scene graph.
  • Create the Transform3D object representing the three-dimensional transformations and, based on it, create the TransformGroup object that represents the node of the scene graph.
  • Create a 3D-object, which is added to the node TransformGroup.
  • The TransformGroup node is added to the node BranchGroup and the BranchGroup node is added to the virtual space VirtualUniverse.
  • In the BranchGroup node, besides 3D-objects, you can add light sources illuminating 3D-objects.
  • For 3D-objects it is possible to define the appearance by adding colors, materials, textures and effects.
  • With the Canvas3D object it is possible to create 3D-graphics in the program way.
  • Animations of the 3D-object are controlled by changing the object Transform3D in time.
  • The following code is a simple Java3D-program that displays the rotated cube:
package javaapplication3d;
import com.sun.j3d.utils.geometry.ColorCube;
import com.sun.j3d.utils.universe.SimpleUniverse;
import javax.media.j3d.BranchGroup;
import javax.media.j3d.Transform3D;
import javax.media.j3d.TransformGroup;
public class JavaApplication3D {
public JavaApplication3D()
{
SimpleUniverse universe = new SimpleUniverse();
BranchGroup group = new BranchGroup();
ColorCube cube=new ColorCube(0.3);
Transform3D rotate = new Transform3D();
rotate.rotX(10);
TransformGroup rotateGroup = new TransformGroup();
rotateGroup.setTransform(rotate);
rotateGroup.addChild(cube);
group.addChild(rotateGroup);
universe.getViewingPlatform().setNominalViewingTransform();
universe.addBranchGraph(group);
}
public static void main(String[] args) {
     JavaApplication3D javaApplication3D = new JavaApplication3D();
}
}

JavaFX 2

  • The JavaFX technology provides a powerful graphical user interface for large-scale data-oriented applications, media-rich applications that deliver diverse media content to users, Mashup applications that integrate a variety of web resources for users, high-quality graphical components and animation to web sites, various types of custom programs that saturated graphics, animation and interactive elements.
  • The same Java code created on the basis of the JavaFX platform can be launched as the desktop application or it can be deployed as the Java Web Start application or it can be displayed in the web browser as the JavaFX applet embedded in an HTML page.
  • The JavaFX 2 Platform provides modern GUI-components, the rich set of graphics and media libraries, and the high-performance execution environment for applications.
  • For an alternative declarative description of the GUI the JavaFX platform offers the FXML language.
  • Also, the JavaFX 2 platform provides the new graphical and media engines, which improve the display of graphics and playback of multimedia content, embedding HTML-content in the application, the new plugin for web browsers, and the wide range of the GUI components with the support of CSS3.
  • Currently JavaFX 2 provides:
    • JavaFX SDK that provides the JavaFX Packager tool for compiling, packaging, and deploying JavaFX applications, Ant library for building JavaFX applications, the JavaFX doclet for Javadoc, JavaFX API, and documentation.
    • JavaFX Runtime for desktop applications and JavaFX applets.
    • Support of the JavaFX 2 platform for NetBeans IDE 7.
    •  Examples of JavaFX applications.
    • The JavaFX 2 platform is integrated into the platform JDK 7 and does not require separate installation.
    • The site of the JavaFX 2 platform is located at http://javafx.com/.

The JavaFX 2 browser plugin is not browser add-ons and its work is provided by the JavaScript-code that embeds the JavaFX-code as a JavaFX-applet on the web page, connecting the JavaFX Runtime installed on the local computer.

JavaFX installation

  • To install the JavaFX 2 platform just download and install the JDK 7 (http://www.oracle.com/technetwork/java/javase/downloads/index.html).
  • To develop applications based on the JavaFX 2 platform just download and install the NetBeans IDE 7 (http://netbeans.org/downloads/).
  • With the selection of the option New Project | JavaFX project in the menu File of the NetBeans IDE the project templates JavaFX Application, JavaFX Preloaderand JavaFX FXML Application will be shown.

JavaFX programming model

  • The same Java code of the JavaFX application can be launched as the desktop application or it can be deployed as the Java Web Start application or it can be displayed in the web browser as the JavaFX applet embedded in an HTML page.
  • The entry point to the JavaFX-application is a Java-class that extends the abstract class javafx.application.Application and contains the method main ():

public class JavaFXApp extends Application {

public static void main(String[] args) {
launch(args);
}
public void init(){
. . .
}

@Override
public void start(Stage primaryStage) {

.. .
primaryStage.setScene(scene);
primaryStage.setVisible(true);
}
public void stop(){
. . .
}
}


In the main() method of the main JavaFX application class the launch() method of the Application class is called that is responsible for loading the JavaFX application. In addition, the main JavaFX application class must override the abstract start() method of the Application class, which provides the creation and display of the JavaFX application scene.


The methods init() and stop() of the Application class can be used to initialize the data and to release the resources of the JavaFX application.


Since the init() method is called before creating the main JavaFX Application Thread, then the initialization of the JavaFX application in the init() method with the scene graph nodes should be implemented using the static method javafx.application.Platform.runLater().


To perform the JavaScript code on the Web page containing the JavaFX application, the main JavaFX application class can use the getHostServices() method of the Application class and the object netscape.javascript.JSObject.


Processing of input parameters in the main JavaFX application class can be made by calling the getParameters() method of the Application class.


To improve the display and handling of the JavaFX application startup and launching it is possible in several ways. The first way is to use the onGetSplash handler of the JavaScript library Deployment Toolkit API to create a splash screen for the JavaFX applet embedded in the Web page. The other way is to apply CSS-styles to the default Preloader. And finally, it is possible to create the custom preloader class that extends the abstract class javafx.application.Preloader and to refer to it in the JNLP deployment descriptor of the JavaFX application. In this regard, for communication of the main JavaFX application class with the preloader it is possible to use the notifyPreloader() method of the Application class.


The start() method of the Application class has the javafx.stage.Stage object as a parameter that represents the main window graphic container of the JavaFX application. This Stage object is created by the runtime when running the JavaFX application and passed to the start() method of the main JavaFX application class what allows to use the methods of the Stage class for the setting and showing of the JavaFX application scene. Instead the Stage object as the argument of the method start(), the developer can create a custom instance of the Stage class to show the JavaFX application scene.


Before the setting and display the scene in the main window graphic container Stage of the JavaFX application is necessary to create a scene graph consisting of a root node and its children, and on its basis to create a scene object javafx.scene.Scene.


As a rule, the javafx.scene.Group object is used as the root node, which is created using the constructor. The Group object is used as an argument of the constructor when creating a javafx.scene.Scene object.


Child nodes of the scene graph that represent the graphics, GUI controls, media content are added to the root node using the getChildren().add() method or the getChildren().addAll() method. Child nodes can have visual effects, blend modes, CSS styles, opacity, transformation, event handlers, and can participate in keyframe animation, in animation with built-in timeline, etc.


Below is the code of the JavaFX 2 application that displayed the rotated cube:


import javafx.application.Application;
import javafx.scene.Group;
import javafx.scene.Scene;
import javafx.scene.paint.Color;
import javafx.scene.text.Font;
import javafx.stage.Stage;

public class JavaFXApp extends Application {
   
    @Override
    public void start(Stage primaryStage) {
       Cube c = new Cube(50,Color.BLUE,2);
       c.setLayoutX(50);
       c.setLayoutY(50);
Group root = new Group();
root.getChildren().addAll(cmHome,cmServices, cmBlog, cmContacts, content1,content2);       
        Scene scene = new Scene(root, 800, 600);
        scene.setFill(Color.BLACK);      
        primaryStage.setScene(scene);
        primaryStage.show();
    }

    public static void main(String[] args) {
        launch(args);
    }
}
package javafxapp;

import javafx.animation.Animation;
import javafx.animation.KeyFrame;
import javafx.animation.KeyValue;
import javafx.animation.Timeline;
import javafx.event.EventHandler;
import javafx.scene.Group;
import javafx.scene.control.Hyperlink;
import javafx.scene.control.HyperlinkBuilder;
import javafx.scene.input.MouseEvent;
import javafx.scene.layout.StackPane;
import javafx.scene.paint.Color;
import javafx.scene.shape.Rectangle;
import javafx.scene.shape.RectangleBuilder;
import javafx.scene.text.Font;
import javafx.scene.transform.Rotate;
import javafx.util.Duration;

public class Cube extends Group {
        final Rotate rx = new Rotate(0,Rotate.X_AXIS);
        final Rotate ry = new Rotate(0,Rotate.Y_AXIS);
        final Rotate rz = new Rotate(0,Rotate.Z_AXIS);      
       
public MenuContainer(double size, Color colorContainer, double shade) {
            rx.setAngle(15);
            ry.setAngle(15);
            rz.setAngle(0);
            this.getTransforms().addAll(rz, ry, rx);
          final Group group=this;
            //
final Rectangle   backFace =   RectangleBuilder.create() // back face
.width(size*2).height(size)
.fill(colorContainer.deriveColor(0.0, 1.0, (1 - 0.3*shade), 1.0))
.translateX(-0.5*size)
.translateY(-0.5*size)
.translateZ(0.5*size)                   
.build()
;
           
              //
final Rectangle   bottomFace =  RectangleBuilder.create() // bottom face
.width(size*2).height(size)
.fill(colorContainer.deriveColor(0.0, 1.0, (1 - 0.3*shade), 1.0))
.translateX(-0.5*size)
.translateY(0)
.rotationAxis(Rotate.X_AXIS)
.rotate(90)                  
.build();
 //
 //
final Rectangle   rightFace =   RectangleBuilder.create() // right face
.width(size).height(size)
.fill(colorContainer.deriveColor(0.0, 1.0, (1 - 0.3*shade), 1.0))
.translateX(1*size)
.translateY(-0.5*size)
.rotationAxis(Rotate.Y_AXIS)
.rotate(90)                  
.build();
 //
 //
final Rectangle   leftFace =   RectangleBuilder.create() // left face
.width(size).height(size)
.fill(colorContainer.deriveColor(0.0, 1.0, (1 - 0.3*shade), 1.0))
.translateX(-1*size)
.translateY(-0.5*size)
.rotationAxis(Rotate.Y_AXIS)
.rotate(90)                  
.build();
 //
 //
final Rectangle   topFace =  RectangleBuilder.create() // top face
.width(size*2).height(size)
.fill(colorContainer.deriveColor(0.0, 1.0, (1 - 0.2*shade), 1.0))
.translateX(-0.5*size)
.translateY(-1*size)
.rotationAxis(Rotate.X_AXIS)
.rotate(90)                   
.build();
 //
 //
          
final Rectangle   face = RectangleBuilder.create() // face
.width(size*2).height(size)
.fill(colorContainer)                 
.build();
face.setTranslateX(-0.5*size);
face.setTranslateY(-0.5*size);
face.setTranslateZ(-0.5*size);
            
final   Timeline animation = new Timeline();
animation.getKeyFrames().addAll(
new KeyFrame(Duration.ZERO, new KeyValue(rx.angleProperty(), 15d)),                      
new KeyFrame(new Duration(1000), new KeyValue(rx.angleProperty(), 375d))                      
);
animation.setCycleCount(Animation.INDEFINITE);
group.setOnMouseDragged(new EventHandler<MouseEvent>() {
@Override
public void handle(MouseEvent event) {         
animation.play();   
double x= event.getSceneX();
double y = event.getSceneY();        
group.setLayoutX(x);
group.setLayoutY(y);
group.setOnMouseReleased(new EventHandler<MouseEvent>() {
@Override
public void handle(MouseEvent event) {
animation.stop();
rx.angleProperty().set(15);
}
});
} });
//
getChildren() .addAll(backFace,bottomFace,rightFace,leftFace,topFace,face);
}
}

Comparison JavaFX 2 and Java3D

  • Both JavaFX 2 and Java3D include API and runtime.
  • Java3D requires a separate installation. JavaFX 2 is included in JDK 7. 
  • Both JavaFX 2 and Java3D can create 3D-graphics. 
  • Java3D provides ready 3D-objects. JavaFX 2 allows creating 3D-objects from 2D-primitives. 
  • JavaFX 2 provides GUI-components, but Java3D is not. 
  • Both JavaFX 2 and Java3D provide transformation and animation facilities. 
  • The JavaFX 2 code automatically compiled into the desktop application and the applet. For Java3D-applet creation the additional code is required. 
  • Both JavaFX 2 and Java3D operate a scene graph. 
  • JavaFX 2 provides a declarative description of the scene graph and the visual editor of the scene graph, but Java3D is not. 
  • Java3D supports textures, but JavaFX 2 is not. 
  • The JavaFX 2 code should be performed in a separate JavaFX Application Thread. The Java3D code runs in the main thread. 
  • The entry point of the JavaFX-application is a Java-class that extends the abstract class javafx.application.Application and contains the method main(). The entry point of Java3D-application is the usual Java-class with the method main()

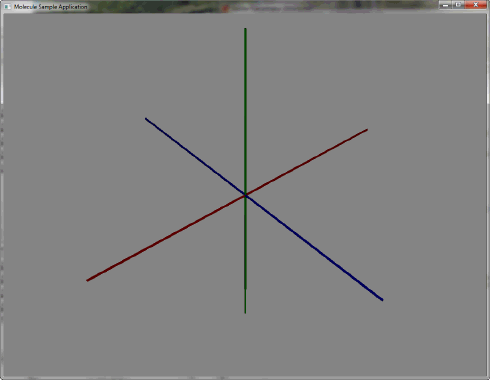
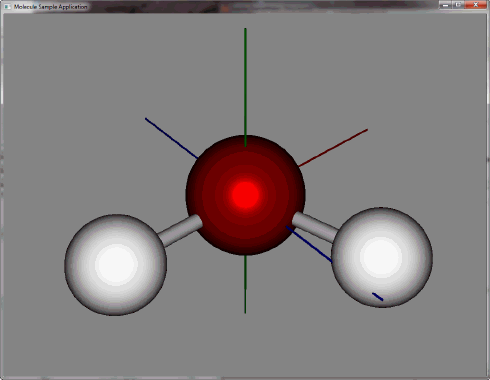
Building a 3D Sample Application


package application;

import javafx.animation.Timeline;
import javafx.application.Application;
import javafx.event.EventHandler;
import javafx.scene.Group;
import javafx.scene.Node;
import javafx.scene.Scene;
import javafx.scene.input.KeyEvent;
import javafx.scene.input.MouseEvent;
import javafx.scene.paint.Color;
import javafx.scene.paint.PhongMaterial;
import javafx.scene.shape.Box;
import javafx.stage.Stage;
import javafx.scene.PerspectiveCamera;
import javafx.scene.shape.Cylinder;
import javafx.scene.shape.Sphere;
import javafx.scene.transform.Rotate;
import javafx.util.Duration;

public class Main extends Application {
final Group root = new Group();
final Group axisGroup = new Group();

final Xform world = new Xform();
final PerspectiveCamera camera = new PerspectiveCamera(true);
final Xform cameraXform = new Xform();
final Xform cameraXform2 = new Xform();
final Xform cameraXform3 = new Xform();
final double cameraDistance = 450;
final Xform moleculeGroup = new Xform();

private Timeline timeline;
boolean timelinePlaying = false;
double ONE_FRAME = 1.0 / 24.0;
double DELTA_MULTIPLIER = 200.0;
double CONTROL_MULTIPLIER = 0.1;
double SHIFT_MULTIPLIER = 0.1;
double ALT_MULTIPLIER = 0.5;

double mousePosX;
double mousePosY;
double mouseOldX;
double mouseOldY;
double mouseDeltaX;
double mouseDeltaY;

private void buildScene() {
System.out.println("buildScene");
root.getChildren().add(world);
}

private void buildAxes() {
System.out.println("buildAxes()");
final PhongMaterial redMaterial = new PhongMaterial();
redMaterial.setDiffuseColor(Color.DARKRED);
redMaterial.setSpecularColor(Color.RED);

final PhongMaterial greenMaterial = new PhongMaterial();
greenMaterial.setDiffuseColor(Color.DARKGREEN);
greenMaterial.setSpecularColor(Color.GREEN);

final PhongMaterial blueMaterial = new PhongMaterial();
blueMaterial.setDiffuseColor(Color.DARKBLUE);
blueMaterial.setSpecularColor(Color.BLUE);

final Box xAxis = new Box(240.0, 1, 1);
final Box yAxis = new Box(1, 240.0, 1);
final Box zAxis = new Box(1, 1, 240.0);

xAxis.setMaterial(redMaterial);
yAxis.setMaterial(greenMaterial);
zAxis.setMaterial(blueMaterial);

axisGroup.getChildren().addAll(xAxis, yAxis, zAxis);
world.getChildren().addAll(axisGroup);
}

@Override
public void start(Stage primaryStage) {
System.out.println("start");
buildScene();
buildCamera();
buildAxes();
buildMolecule();

Scene scene = new Scene(root, 1024, 768, true);
scene.setFill(Color.GREY);
handleKeyboard(scene, world);
        handleMouse(scene, world);

primaryStage.setTitle("Molecule Sample Application");
primaryStage.setScene(scene);
primaryStage.show();
scene.setCamera(camera);

}

private void buildCamera() {
root.getChildren().add(cameraXform);
cameraXform.getChildren().add(cameraXform2);
cameraXform2.getChildren().add(cameraXform3);
cameraXform3.getChildren().add(camera);
cameraXform3.setRotateZ(180.0);

camera.setNearClip(0.1);
camera.setFarClip(10000.0);
camera.setTranslateZ(-cameraDistance);
cameraXform.ry.setAngle(320.0);
cameraXform.rx.setAngle(40);
}

//
// This buildMolecule file contains the buildMolecule() method that is used
// in
// the MoleculeSampleApp application that you can build using the Getting
// Started with
// JavaFX 3D Graphics tutorial.
//

private void buildMolecule() {

final PhongMaterial redMaterial = new PhongMaterial();
redMaterial.setDiffuseColor(Color.DARKRED);
redMaterial.setSpecularColor(Color.RED);

final PhongMaterial whiteMaterial = new PhongMaterial();
whiteMaterial.setDiffuseColor(Color.WHITE);
whiteMaterial.setSpecularColor(Color.LIGHTBLUE);

final PhongMaterial greyMaterial = new PhongMaterial();
greyMaterial.setDiffuseColor(Color.DARKGREY);
greyMaterial.setSpecularColor(Color.GREY);

// Molecule Hierarchy
// [*] moleculeXform
// [*] oxygenXform
// [*] oxygenSphere
// [*] hydrogen1SideXform
// [*] hydrogen1Xform
// [*] hydrogen1Sphere
// [*] bond1Cylinder
// [*] hydrogen2SideXform
// [*] hydrogen2Xform
// [*] hydrogen2Sphere
// [*] bond2Cylinder

Xform moleculeXform = new Xform();
Xform oxygenXform = new Xform();
Xform hydrogen1SideXform = new Xform();
Xform hydrogen1Xform = new Xform();
Xform hydrogen2SideXform = new Xform();
Xform hydrogen2Xform = new Xform();

Sphere oxygenSphere = new Sphere(40.0);
oxygenSphere.setMaterial(redMaterial);

Sphere hydrogen1Sphere = new Sphere(30.0);
hydrogen1Sphere.setMaterial(whiteMaterial);
hydrogen1Sphere.setTranslateX(0.0);

Sphere hydrogen2Sphere = new Sphere(30.0);
hydrogen2Sphere.setMaterial(whiteMaterial);
hydrogen2Sphere.setTranslateZ(0.0);

Cylinder bond1Cylinder = new Cylinder(5, 100);
bond1Cylinder.setMaterial(greyMaterial);
bond1Cylinder.setTranslateX(50.0);
bond1Cylinder.setRotationAxis(Rotate.Z_AXIS);
bond1Cylinder.setRotate(90.0);

Cylinder bond2Cylinder = new Cylinder(5, 100);
bond2Cylinder.setMaterial(greyMaterial);
bond2Cylinder.setTranslateX(50.0);
bond2Cylinder.setRotationAxis(Rotate.Z_AXIS);
bond2Cylinder.setRotate(90.0);

moleculeXform.getChildren().add(oxygenXform);
moleculeXform.getChildren().add(hydrogen1SideXform);
moleculeXform.getChildren().add(hydrogen2SideXform);
oxygenXform.getChildren().add(oxygenSphere);
hydrogen1SideXform.getChildren().add(hydrogen1Xform);
hydrogen2SideXform.getChildren().add(hydrogen2Xform);
hydrogen1Xform.getChildren().add(hydrogen1Sphere);
hydrogen2Xform.getChildren().add(hydrogen2Sphere);
hydrogen1SideXform.getChildren().add(bond1Cylinder);
hydrogen2SideXform.getChildren().add(bond2Cylinder);

hydrogen1Xform.setTx(100.0);
hydrogen2Xform.setTx(100.0);
hydrogen2SideXform.setRotateY(104.5);

moleculeGroup.getChildren().add(moleculeXform);

world.getChildren().addAll(moleculeGroup);
}

/**
* The main() method is ignored in correctly deployed JavaFX application.
* main() serves only as fallback in case the application can not be
* launched through deployment artifacts, e.g., in IDEs with limited FX
* support. NetBeans ignores main().
*
* @param args
*            the command line arguments
*/
public static void main(String[] args) {
System.setProperty("prism.dirtyopts", "false");
launch(args);
}

private void handleMouse(Scene scene, final Node root) {
scene.setOnMousePressed(new EventHandler<MouseEvent>() {
public void handle(MouseEvent me) {
mousePosX = me.getSceneX();
mousePosY = me.getSceneY();
mouseOldX = me.getSceneX();
mouseOldY = me.getSceneY();
}
});
scene.setOnMouseDragged(new EventHandler<MouseEvent>() {
public void handle(MouseEvent me) {
mouseOldX = mousePosX;
mouseOldY = mousePosY;
mousePosX = me.getSceneX();
mousePosY = me.getSceneY();
mouseDeltaX = (mousePosX - mouseOldX);
mouseDeltaY = (mousePosY - mouseOldY);

double modifier = 1.0;
double modifierFactor = 0.1;

if (me.isControlDown()) {
modifier = 0.1;
}
if (me.isShiftDown()) {
modifier = 10.0;
}
if (me.isPrimaryButtonDown()) {
cameraXform.ry.setAngle(cameraXform.ry.getAngle()
- mouseDeltaX * modifierFactor * modifier * 2.0); // +
cameraXform.rx.setAngle(cameraXform.rx.getAngle()
+ mouseDeltaY * modifierFactor * modifier * 2.0); // -
} else if (me.isSecondaryButtonDown()) {
double z = camera.getTranslateZ();
double newZ = z + mouseDeltaX * modifierFactor * modifier;
camera.setTranslateZ(newZ);
} else if (me.isMiddleButtonDown()) {
cameraXform2.t.setX(cameraXform2.t.getX() + mouseDeltaX
* modifierFactor * modifier * 0.3); // -
cameraXform2.t.setY(cameraXform2.t.getY() + mouseDeltaY
* modifierFactor * modifier * 0.3); // -
}
}
});
}

private void handleKeyboard(Scene scene, final Node root) {
final boolean moveCamera = true;
scene.setOnKeyPressed(new EventHandler<KeyEvent>() {
public void handle(KeyEvent event) {
Duration currentTime;
switch (event.getCode()) {
case Z:
if (event.isShiftDown()) {
cameraXform.ry.setAngle(0.0);
cameraXform.rx.setAngle(0.0);
camera.setTranslateZ(-300.0);
}
cameraXform2.t.setX(0.0);
cameraXform2.t.setY(0.0);
break;
case X:
if (event.isControlDown()) {
if (axisGroup.isVisible()) {
System.out.println("setVisible(false)");
axisGroup.setVisible(false);
} else {
System.out.println("setVisible(true)");
axisGroup.setVisible(true);
}
}
break;
case S:
if (event.isControlDown()) {
if (moleculeGroup.isVisible()) {
moleculeGroup.setVisible(false);
} else {
moleculeGroup.setVisible(true);
}
}
break;
case SPACE:
if (timelinePlaying) {
timeline.pause();
timelinePlaying = false;
} else {
timeline.play();
timelinePlaying = true;
}
break;
case UP:
if (event.isControlDown() && event.isShiftDown()) {
cameraXform2.t.setY(cameraXform2.t.getY() - 10.0
* CONTROL_MULTIPLIER);
} else if (event.isAltDown() && event.isShiftDown()) {
cameraXform.rx.setAngle(cameraXform.rx.getAngle()
- 10.0 * ALT_MULTIPLIER);
} else if (event.isControlDown()) {
cameraXform2.t.setY(cameraXform2.t.getY() - 1.0
* CONTROL_MULTIPLIER);
} else if (event.isAltDown()) {
cameraXform.rx.setAngle(cameraXform.rx.getAngle() - 2.0
* ALT_MULTIPLIER);
} else if (event.isShiftDown()) {
double z = camera.getTranslateZ();
double newZ = z + 5.0 * SHIFT_MULTIPLIER;
camera.setTranslateZ(newZ);
}
break;
case DOWN:
if (event.isControlDown() && event.isShiftDown()) {
cameraXform2.t.setY(cameraXform2.t.getY() + 10.0
* CONTROL_MULTIPLIER);
} else if (event.isAltDown() && event.isShiftDown()) {
cameraXform.rx.setAngle(cameraXform.rx.getAngle()
+ 10.0 * ALT_MULTIPLIER);
} else if (event.isControlDown()) {
cameraXform2.t.setY(cameraXform2.t.getY() + 1.0
* CONTROL_MULTIPLIER);
} else if (event.isAltDown()) {
cameraXform.rx.setAngle(cameraXform.rx.getAngle() + 2.0
* ALT_MULTIPLIER);
} else if (event.isShiftDown()) {
double z = camera.getTranslateZ();
double newZ = z - 5.0 * SHIFT_MULTIPLIER;
camera.setTranslateZ(newZ);
}
break;
case RIGHT:
if (event.isControlDown() && event.isShiftDown()) {
cameraXform2.t.setX(cameraXform2.t.getX() + 10.0
* CONTROL_MULTIPLIER);
} else if (event.isAltDown() && event.isShiftDown()) {
cameraXform.ry.setAngle(cameraXform.ry.getAngle()
- 10.0 * ALT_MULTIPLIER);
} else if (event.isControlDown()) {
cameraXform2.t.setX(cameraXform2.t.getX() + 1.0
* CONTROL_MULTIPLIER);
} else if (event.isAltDown()) {
cameraXform.ry.setAngle(cameraXform.ry.getAngle() - 2.0
* ALT_MULTIPLIER);
}
break;
case LEFT:
if (event.isControlDown() && event.isShiftDown()) {
cameraXform2.t.setX(cameraXform2.t.getX() - 10.0
* CONTROL_MULTIPLIER);
} else if (event.isAltDown() && event.isShiftDown()) {
cameraXform.ry.setAngle(cameraXform.ry.getAngle()
+ 10.0 * ALT_MULTIPLIER); // -
} else if (event.isControlDown()) {
cameraXform2.t.setX(cameraXform2.t.getX() - 1.0
* CONTROL_MULTIPLIER);
} else if (event.isAltDown()) {
cameraXform.ry.setAngle(cameraXform.ry.getAngle() + 2.0
* ALT_MULTIPLIER); // -
}
break;
}
}
});
}

}