Monday, 30 September 2013

Can we synchronize static method/variable in a Java class?


Yes, you can do it.
A synchronized method or block works on a given monitor. Synchronized non-static methods all synchronize on the Java instance of a class. Each instance has a lock monitor. For the case of static methods, what object does static synchronized methods use for locking? The static synchronized statements obtain a lock on the Class object. The following example show you few ways to access the class object:
class MyClass {


    public static void main(String[] args) {
        //you can access class object through an instance of that class
        MyClass objectinstance = new MyClass();
        java.lang.Class myclass1 = objectinstance.getClass();

        //non-instance ways
        java.lang.Class myclass2 = Myclass.class;
 java.lang.Class myclass3 = Class.forName("MyClass");
    }

}
The JVM creates a Class object when the class is loaded (When it is used for the first time). Once a class is loaded into a JVM, the same class will not be loaded again. The JVM creates one instance of Class for each class that is loaded, The Class instances are Objects and can be synchronized via static synchronized methods.
For example
class MyClass  {
  ...
  public synchronized static someMethod() {
    ...
  }
  ...
}
It is the equivalent to the following static synchronized block:
synchronized ( MyClass.class ) {
...
}
In some situatios, you need to protect access static variables, the locking an object instance does not automatically protect access to static variables, because there may have more than one instances and all of them use the same static variables. You have to obtain a lock on the Class vs an instance of the class. A static synchronized block can be use to protect access to static varibales, a lock on a static method has no effect on any instances of that class (see the Java Language Specification). For example,
class BumpTest {

 int count;
 static int classCount;
 void synchronized bump() {
  count++;

  try {
   synchronized (BumpTest.class) { 
                        //or synchronized (Class.forname("BumpTest"))
    classCount++;
   }
  } catch (ClassNotFoundException e) {
 }
    ...
}
Static variables, like static methods, are not inherited, but are accessible from within the body of the class definition and through an explicit reference to the defining class's name. Adding a new static synchronized method in a subclass cannot protect other threads to access static variables defined in its superclass nor should you use synchronized(this.getClass()) which locks the actual Class might be the subclass. An explicit block synchronization with "none-instance way to get Class" is the preferred way.

 synchronized Methods
A synchronized method acquires a monitor  before it executes. For a class (static) method, the monitor associated with the Class object for the method's class is used. For an instance method, the monitor associated with this (the object for which the method was invoked) is used.
Converter Tiff to jpeg


Embedding Swing Content in JavaFX Applications

This article describes how to embed Swing components in JavaFX applications. It discusses the threading restrictions and provides working applications that illustrate Swing buttons with HTML content embedded in a JavaFX application and interoperability between Swing and JavaFX buttons.
The ability to embed JavaFX content in Swing applications has existed since the JavaFX 2.0 release. To enhance the interoperability of JavaFX and Swing, JavaFX 8 introduces a new class that provides reverse integration and enables developers to embed Swing components in JavaFX applications.
Before you run any code from this article, install JDK 8 on your computer.

SwingNode Class

JavaFX 8 introduces the SwingNode class, which is located in the javafx.embed.swing package. This class enables you to embed Swing content in a JavaFX application. To specify the content of the SwingNode object, call the setContent method, which accepts an instance of thejavax.swing.JComponent class. You can call the setContent method on either the JavaFX application thread or event dispatch thread (EDT). However, to access the Swing content, ensure that your code runs on EDT, because the standard Swing threading restrictions apply.
The code shown in Example 1 illustrates the general pattern of using the SwingNode class.
Example 1
import javafx.application.Application;
import javafx.embed.swing.SwingNode;
import javafx.scene.Scene;
import javafx.scene.layout.StackPane;
import javafx.stage.Stage;
import javax.swing.JButton;
import javax.swing.SwingUtilities;

public class SwingFx extends Application {

    @Override
    public void start (Stage stage) {
        final SwingNode swingNode = new SwingNode();

        createSwingContent(swingNode);

        StackPane pane = new StackPane();
        pane.getChildren().add(swingNode);

        stage.setTitle("Swing in JavaFX");
        stage.setScene(new Scene(pane, 250, 150));
        stage.show();
        }

    private void createSwingContent(final SwingNode swingNode) {
        SwingUtilities.invokeLater(new Runnable() {
            @Override
            public void run() {
                swingNode.setContent(new JButton("Click me!"));
            }
        });
    }
}
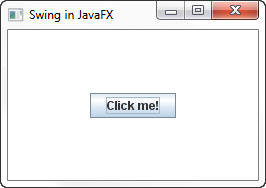
When run, this code produces the output shown in Figure 1.
Figure 1 Swing JButton Embedded in a JavaFX Application
Description of Figure 1 follows
Description of "Figure 1 Swing JButton Embedded in a JavaFX Application"

Embedding Swing Content and Handling Events

The ButtonHtmlDemo in the Swing tutorial adds font, color, and other formatting to three buttons shown in Example 2 and Example 3. The buttons respond to mouse and keyboard events as shown in Example 5 and Example 6Figure 2 shows the three buttons created using Swing in theButtonHtmlDemo now embedded in a JavaFX Application (SwingNodeSample). You will create theSwingNodeSample application and ensure that all events are delivered to an appropriate Swing button and get processed.
Figure 2 ButtonHtmlDemo Embedded in a JavaFX Application
Description of Figure 2 follows
Description of "Figure 2 ButtonHtmlDemo Embedded in a JavaFX Application"
The left and right buttons have multiple lines of text implemented with the HTML formatting as shown in Example 2.
Example 2
b1 = new JButton("<html><center><b><u>D</u>isable</b><br>"
                 + "<font color=#ffffdd>middle button</font>",
                 leftButtonIcon);

b3 = new JButton("<html><center><b><u>E</u>nable</b><br>"
                 + "<font color=#ffffdd>middle button</font>",
                 rightButtonIcon);
The simple format of middle button does not require HTML, so it is initialized with a string label and an image as shown in Example 3.
Example 3
b2 = new JButton("middle button", middleButtonIcon);
All three buttons have the tooltips and mnemonic characters as shown in Example 4.
Example 4
b1.setToolTipText("Click this button to disable the middle button.");
b2.setToolTipText("This middle button does nothing when you click it.");
b3.setToolTipText("Click this button to enable the middle button.");

b1.setMnemonic(KeyEvent.VK_D);
b2.setMnemonic(KeyEvent.VK_M);
b3.setMnemonic(KeyEvent.VK_E);
The left and right buttons are used to disable and enable the middle button respectively. To enable the application to detect and respond to user action on these buttons, attach action listeners and set action commands as shown in Example 5.
Example 5
b1.addActionListener(this);
b3.addActionListener(this);

b1.setActionCommand("disable");
b3.setActionCommand("enable");
Implement the actionPerformed method shown in Example 6. This method is called when the user clicks the left or right button.
Example 6
public void actionPerformed(ActionEvent e) {
    if ("disable".equals(e.getActionCommand())) {
        b2.setEnabled(false);
        b1.setEnabled(false);
        b3.setEnabled(true);
    } else {
        b2.setEnabled(true);
        b1.setEnabled(true);
        b3.setEnabled(false);
    }
}
See the complete code of the ButtonHtml class.
Now set up a JavaFX project and run the SwingNodeSample application.
To create the SwingNodeSample application:
Ensure that JDK 8 is installed on your computer. Then set up a JavaFX project in NetBeans IDE:
  1. From the File menu, choose New Project.
  2. In the JavaFX application category, choose JavaFX Application and click Next.
  3. Name the project SwingNodeSample and select a JavaFX platform based on JDK 8. ClickFinish.
  4. In the Projects window, right-click the swingnodesample folder under Source Packages. Choose New and then choose Java class.
  5. Name a new class ButtonHtml and click Finish.
  6. Copy the code of the ButtonHtml class and paste it in the project.
  7. Open the swingnodesample folder on your disk and create the images folder.
  8. Download the images left.gifmiddle.gif, and right.gif and save them in the images folder.
  9. In the SwingNodeSample class, remove the code inside the start method that was automatically generated by NetBeans.
  10. Instead, create a SwingNode object and implement the start method as shown in Example 7.
    Example 7
    @Override
    public void start(Stage stage) {
        final SwingNode swingNode = new SwingNode();
        createSwingContent(swingNode);
        StackPane pane = new StackPane();
        pane.getChildren().add(swingNode);
    
        Scene scene = new Scene(pane, 450, 100);
        stage.setScene(scene);
        stage.setTitle("ButtonHtmlDemo Embedded in JavaFX");
        stage.show();
    }
    
  11. To embed the three buttons produced by the ButtonHtml class, set the content of the SwingNode object to be an instance of the ButtonHtml class as shown in Example 8.
    Example 8
    private void createSwingContent(final SwingNode swingNode) {
        SwingUtilities.invokeLater(new Runnable() {
            @Override
            public void run() {
            swingNode.setContent(new ButtonHtml());
            }
    
        });
    }
    
  12. Press Ctrl (or Cmd) + Shift + I to correct the import statements.
To download the source code of the SwingNodeSample application, click the SwingNodeSample.ziplink.
Run the SwingNodeSample project and ensure that all means of interactivity provided for the buttons work as they should:
  • With the mouse, hover over the buttons and see the tooltips.
  • Click the left and right buttons to disable and enable the middle button respectively.
  • Press Alt + D and Alt + E keys to disable and enable the middle button respectively.

Adding Interoperability Between Swing and JavaFX Components

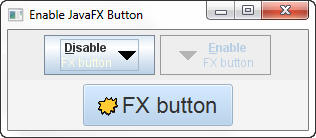
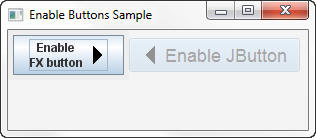
You can provide interoperability between JavaFX buttons and Swing buttons. For example, theEnableFXButton application shown in Figure 3 enables a user to click Swing buttons to disable or enable a JavaFX button. Conversely, the EnableButtons application shown in Figure 4 enables a user to click a JavaFX button to activate a Swing button.
Figure 3 Enable JavaFX Button Sample
Description of Figure 3 follows
Description of "Figure 3 Enable JavaFX Button Sample"
Using Swing Buttons to Operate a JavaFX Button
The EnableFXButton application is created by modifying the SwingNodeSample application and making the middle button an instance of the javafx.scene.control.Button class. In the modified application, the Swing buttons (Disable FX button) and (Enable FX button) are used to disable and enable a JavaFX button (FX Button). Figure 3 shows the EnableFXButton application.
Follow these steps to create the EnableFXButton application:
  1. From the File menu, choose New Project.
  2. In the JavaFX application category, choose JavaFX Application and click Next.
  3. Name the project EnableFXButton.
  4. In the Projects window, right-click the enablefxbutton folder under Source Packages. Choose New and then choose Java class.
  5. Name the new class ButtonHtml and click Finish.
  6. Copy the code of the ButtonHtml class and paste it in the project.
  7. Change the package declaration to enablefxbutton.
  8. Open the enablefxbutton folder on your disk and create the images folder.
  9. Download the images down.gif and middle.gif and save them in the images folder.
  10. In the EnableFXButton class, declare a Button object as shown in Example 9.
    Example 9
    public class EnableFXButton extends Application {
        public static Button fxbutton;
    
  11. Remove the code inside the start method that was automatically generated by NetBeans IDE and implement the start method as shown in Example 10.
    Example 10
    @Override
    public void start(Stage stage) {
        final SwingNode swingNode = new SwingNode();
        createSwingContent(swingNode);
        BorderPane pane = new BorderPane();
        fxbutton = new Button("FX button");
        
        pane.setTop(swingNode);
        pane.setCenter(fxbutton);
    
        Scene scene = new Scene(pane, 300, 100);
        stage.setScene(scene);
        stage.setTitle("Enable JavaFX Button");
        stage.show();
    }
    
  12. Add the import statement for the SwingNode class as shown in Example 11.
    Example 11
    import javafx.embed.swing.SwingNode;
    
  13. Implement the createSwingContent method to set the content of the SwingNode object as shown in Example 12.
    Example 12
    private void createSwingContent(final SwingNode swingNode) {
        SwingUtilities.invokeLater(new Runnable() {
            @Override
            public void run() {
            swingNode.setContent(new ButtonHtml());
            }
    
        });
    }
    
  14. Press Ctrl (or Cmd) + Shift + I to add an import statement to thejavax.swing.SwingUtilities class.
  15. Replace the initialization of fxbutton with the code shown in Example 13 to add an image and set a tooltip and style for the JavaFX button.
    Example 13
    Image fxButtonIcon = new Image(
    getClass().getResourceAsStream("images/middle.gif"));
    
    fxbutton = new Button("FX button", new ImageView(fxButtonIcon));
    fxbutton.setTooltip(
    new Tooltip("This middle button does nothing when you click it."));
    fxbutton.setStyle("-fx-font: 22 arial; -fx-base: #cce6ff;");
    
  16. Press Ctrl (or Cmd) + Shift + I to add the import statements shown in Example 14.
    Example 14
    import javafx.scene.image.Image;
    import javafx.scene.image.ImageView;
    import javafx.scene.control.Tooltip;
    
  17. Open the ButtonHtml class and and remove all code related to the middle button b2.
  18. Use the down.gif image for b1 (Disable FX button) and b3 (Enable FX button) buttons as shown in Example 15.
    Example 15
    ImageIcon buttonIcon = createImageIcon("images/down.gif");
    b1 = new JButton("<html><center><b><u>D</u>isable</b><br>"
                             + "<font color=#ffffdd>FX button</font>", 
                             buttonIcon);
    b3 = new JButton("<html><center><b><u>E</u>nable</b><br>"
                             + "<font color=#ffffdd>FX button</font>", 
                             buttonIcon);
    
  19. Modify the actionPerformed method to implement the disabling and enabling of fxbuttonas shown in Example 16. Note that the disabling and enabling of the JavaFX button must happen on the JavaFX application thread.
    Example 16
    @Override
    public void actionPerformed(ActionEvent e) {
        if ("disable".equals(e.getActionCommand())) {
            Platform.runLater(new Runnable() {
                @Override
                public void run() {
                    EnableFXButton.fxbutton.setDisable(true);
                }
            });
            b1.setEnabled(false);
            b3.setEnabled(true);
        } else {
            Platform.runLater(new Runnable() {
                @Override
                public void run() {
                    EnableFXButton.fxbutton.setDisable(false);
                }
            });
            b1.setEnabled(true);
            b3.setEnabled(false);
        }
    }
    
  20. Press Ctrl (or Cmd) + Shift + I to add the import statement shown in Example 17.
    Example 17
    import javafx.application.Platform;
    
  21. Run the application and click the Swing buttons to disable and enable the JavaFX button, as shown in Figure 3.
Using a JavaFX Button to Operate a Swing Button
You can further modify the EnableFXButton application and implement the setOnAction method for the JavaFX button so that clicking the JavaFX button activates the Swing button. The modified application (EnableButtons) is shown in Figure 4.
Figure 4 Enable Buttons Sample
Description of Figure 4 follows
Description of "Figure 4 Enable Buttons Sample"
To create the EnableButtons application:
  1. Copy the EnableFXButton project and save it under the EnableButtons name.
  2. Rename the EnableFXButton class to EnableButtons and the enablefxbutton package toenablebuttons.
  3. Correct the package statement in both the ButtonHtml and EnableButtons classes.
  4. Open the EnableButtons class and make the pane an instance of the FlowPane class as shown in Example 18.
    Example 18
    FlowPane pane = new FlowPane();
    
  5. Modify the initialization of the fxButtonIcon variable to use the left.gif image as shown inExample 19.
    Example 19
    Image fxButtonIcon = new Image(
    getClass().getResourceAsStream("images/left.gif"));
    
  6. Change the fxbutton text, tooltip, and font size and set the disableProperty to true as shown in Example 20.
    Example 20
    fxbutton = new Button("Enable JButton", new ImageView(fxButtonIcon));
    fxbutton.setTooltip(
    new Tooltip("Click this button to enable the Swing button."));
    fxbutton.setStyle("-fx-font: 18 arial; -fx-base: #cce6ff;");
    fxbutton.setDisable(true);
    
  7. Implement the setOnAction method as shown in Example 21. Note that you must change Swing objects on event dispatch thread only.
    Example 21
    fxbutton.setOnAction(new javafx.event.EventHandler<ActionEvent>() {
        @Override
        public void handle(ActionEvent e) {
            SwingUtilities.invokeLater(new Runnable() {
                @Override
                public void run() {
                ButtonHtml.b1.setEnabled(true);
                }
             });
        fxbutton.setDisable(true);
        }
    });
    

    Note:
    Ignore the error mark that appears on the left of the line that enables b1. You will correct this error at step 11.
  8. Press Ctrl (or Cmd) + Shift + I to add the import statement to thejavafx.event.ActionEvent class.
  9. Add the swingNode and fxbutton objects to the layout container as shown in Example 22.
    Example 22
    pane.getChildren().addAll(swingNode, fxbutton);
    
  10. Change the application title to "Enable Buttons Sample" as shown in Example 23.
    Example 23
    stage.setTitle("Enable Buttons Sample");
    
  11. Open the ButtonHtml class and change the modifier of the b1 button to public static. Notice that the error mark in the EnableButtons class has disappeared.
  12. Remove all code related to the b3 button and the line that sets an action command for b1.
  13. Modify the actionPerformed method as shown in Example 24.
    Example 24
    @Override
    public void actionPerformed(ActionEvent e) {
        Platform.runLater(new Runnable() {
            @Override
            public void run() {
                EnableButtons.fxbutton.setDisable(false);
            }
        });
        b1.setEnabled(false);
    }
    

Conclusion

In this article you learned how to embed existing Swing components in JavaFX applications and provide interoperability between Swing and JavaFX objects. The ability to embed Swing content into JavaFX applications enables developers to migrate Swing applications that use complex third-party Swing components for which they do not have source code or applications that have legacy modules that exist only in maintenance mode.

Friday, 27 September 2013

Servlet Basic Notes


                                                For Download Click Here

Difference between ServletConfig and ServletContext

ServletConfig

Signature: public interface ServletConfig


ServletConfig is implemented by the servlet containerto initialize a single servlet using init(). That is, you can pass initialization parameters to the servlet using the web.xml deployment descriptor. For understanding, this is similar to a constructor in a java class.


Example code:
<servlet>
<servlet-name>ServletConfigTest</servlet-name>
<servlet-class>com.javapapers.ServletConfigTest</servlet-class>
<init-param>
<param-name>topic</param-name>
<param-value>Difference between ServletConfig and ServletContext</param-value>
</init-param>
</servlet>


ServletContext


Signature: public interface ServletContext


ServletContext is implemented by the servlet container for all servlet to communicate with its servlet container, for example, to get the MIME type of a file, to get dispatch requests, or to write to a log file. That is to get detail about its execution environment. 

It is applicable only within a single Java Virtual Machine. If a web applicationa is distributed between multiple JVM this will not work. For understanding, this is like a application global variable mechanism for a single web application deployed in only one JVM.


The ServletContext object is contained within the ServletConfig object. That is, the ServletContext can be accessed using the ServletConfig object within a servlet. You can specify param-value pairs for ServletContext object in <context-param> tags in web.xml file.

 Example code:

<context-param>
<param-name>globalVariable</param-name>
<param-value>javapapers.com</param-value>
</context-param>


3D Dicom Testing Dataset: Patient Position And Orientation

ATIENT COORDINATE SYSTEM & INTERPRETATION OF DICOM CT/MR IMAGE SETS 


============================================

This document contains some notes on the patient coordinate system 


conventions which are used in the ACR/NEMA DICOM 3.0 standard.  


Information on how to interpret the location of CT and MR images within a patient coordinate system is also included.   

******************************************************************** 


What does the patient coordinate system look like? 


        HEAD                     +Z(H) 
              POSTERIOR           |  / +Y(P) 

         ()                       | / 

 RIGHT  -/\-  LEFT                |/ 

         ||           -X(R) ------+------ +X(L) 
ANTERIOR                         /| 
        FEET                    / | 
                               /  | 
                          -Y(A)  -Z(F) 


In this diagram the patient is facing forward.  Anterior refers to the  front of the patient.  Posterior refers to the back of the patient.  

The origin of the patient coordinate system is arbitrary, and selected by the imaging modality.  I assume that the modality is free to choose a different origin for each series of images, but the origin is fixed for a given series. 


If you wish to annotate images when displayed with notations such as (L) or (R) to indicate which side of the 2D image is considered the patient's left or right side, you need the Patient Position (0018, 5100) Attribute from the General Series module. 


This attribute contains the position of the patient relative to the imaging equipment space.Valid values are:

 
    1.Head First-Prone 
    2.Head First-Supine
    3.Head First-Decubitus Right
    4.Head First-Decubitus Left
    5.Feet First-Decubitus Left
    6.Feet First-Decubitus Right
    7.Feet First-Prone
    8.Feet First-Supine. 


Definitions:

Head First means the patient was laying on the imaging couch with the head facing the imaging device first. 


Feet first means the patient was laying on the imaging couch with the feet facing the imaging device first. 


Prone means the patient is laying on his/her stomach.  (Patient's face being positioned in a downwards (gravity) direction.) 


Supine means the patient is laying on his/her back.  (Patient's face being in an upwards direction.) 


Decubitus Right means the patient is laying with his/her right side in a downwards direction. 


Decubitus Left means the patient is laying with his/her left side in a downwards direction. 


NOTE -- Patient Position (0018, 5100) is a type 1 required attribute for both the CT and MR modalities.  This attribute is VERY IMPORTANT for accurately interpreting the patient's orientation. 


*************************************************************************************** 
What is a direction cosine? 

Basically, a direction cosine is the cosine of the angle which is created between a unit vector which starts at the origin with some direction, and a unit vector coincident with one of the axis of the coordinate system. 


To fully define the point in space at the end of a vector it requires nine direction cosines.  Since in a right handed cartesian coordinate system the cross product of two unit vectors defines the third, you can fully describe the location using only six direction cosines.  The other three may be calculated. 


******************************************************************** 
Where can I learn about direction cosines? 

The following references may be of help in understanding what a direction cosine is. 

Mathematical Methods for Physicists.  Arfken.  Academic Press, 1996.   


pp 3-5.  pp 143-160. 

Computer Graphics Principles and Practice, 2nd Edition. Foley, van 


Dam, Feiner, Hughes.  Addison Wesley, 1987.  pp 213-222, 1103-1105. 

Vector Mechanics for Engineers, STATICS and DYNAMICS, 3rd Edition.   


Beer, Johnston jr.  McGraw Hill, 1977.  pp 43-46. 

********************************************

How do I orient a single image in the patient coordinate system? 

In order to orient a single image plane in the patient coordinate system a 4x4 transform matrix must be defined.  This matrix is derived as follows: 


Given: 
        xr = x row direction cosine 


        yr = y row direction cosine 

        zr = z row direction cosine 

        xc = x column direction cosine 


        yc = y column direction cosine 

        zc = z column direction cosine 


First calculate the slice direction cosine values for x, y, and z.  This is the cross-product of the row and column direction cosines. 


        xs = (yr * zc) - (zr * yc) 
        ys = (zr * xc) - (xc * zc) 

        zs = (xr * yc) - (yr * xc) 


Then, the 4x4 matrix is as follows: 

       [ xr yr zr 1 ] 
   M = [ xc yc zc 1 ] 

       [ xs ys zs 1 ] 

       [ 0  0  0  1 ]


The image plane is then transformed from the origin to the proper location in the patient coordinate system as follows: 


Given: 

(c,r) = column and row of pixel in 2D image plane (x,y,z) = x, y, and z coordinates for pixel in patient coordinate system. 


Through matrix multiplication, the transformed coordinates are: 


        (c, r, 0, 1) * M = (x, y, z, 1)


David Clunie wrote: 


It really is a piece of cake to derive what you want ... for example in the following code assume "vector" is either a Row vector or Column vector from Image Orientation (Patient)  and "orientation" becomes what you want by picking out the "most significant" axis sequentially, and noting the sign. The DICOM convention is Left Posterior Head +ve.


  char *orientation=new char[4]; 
  char *optr = orientation; 

  *optr='\0'; 

char orientationX=vector.getX()<0?'R' :'L'; 
char orientationY=vector.getY()<0? 'A':'P'; 

char orientationZ=vector.getZ()<0?'F': 'H';

        double absX = fabs(vector.getX()); 
        double absY = fabs(vector.getY()); 

        double absZ = fabs(vector.getZ()); 


int i; 
for (i=0; i<3; ++i) { 
    if(absX>.0001 && absX>absY && absX>absZ)    { 

     *optr++=orientationX; 

     absX=0; 
}
else if(absY>.0001 && absY>absX&& absY>absZ) { 
    *optr++=orientationY; 
     absY=0; 
else if(absZ>.0001 &&absZ>absX && absZ>absY) { 
                                     *optr++=orientationZ; 
 absZ=0; 
else break; 
*optr='\0';